That being said, we only promote authors, products, and services that we use ourselves and wholeheartedly stand by. To learn more about how we earn money here on Autoimmune Wellness, head on over to our Promotional Policy.
I’m staring a new series of recipes that can serve as the cornerstone of any batch-cooking session (want to learn more? Check out my post Batch Cooking 101).
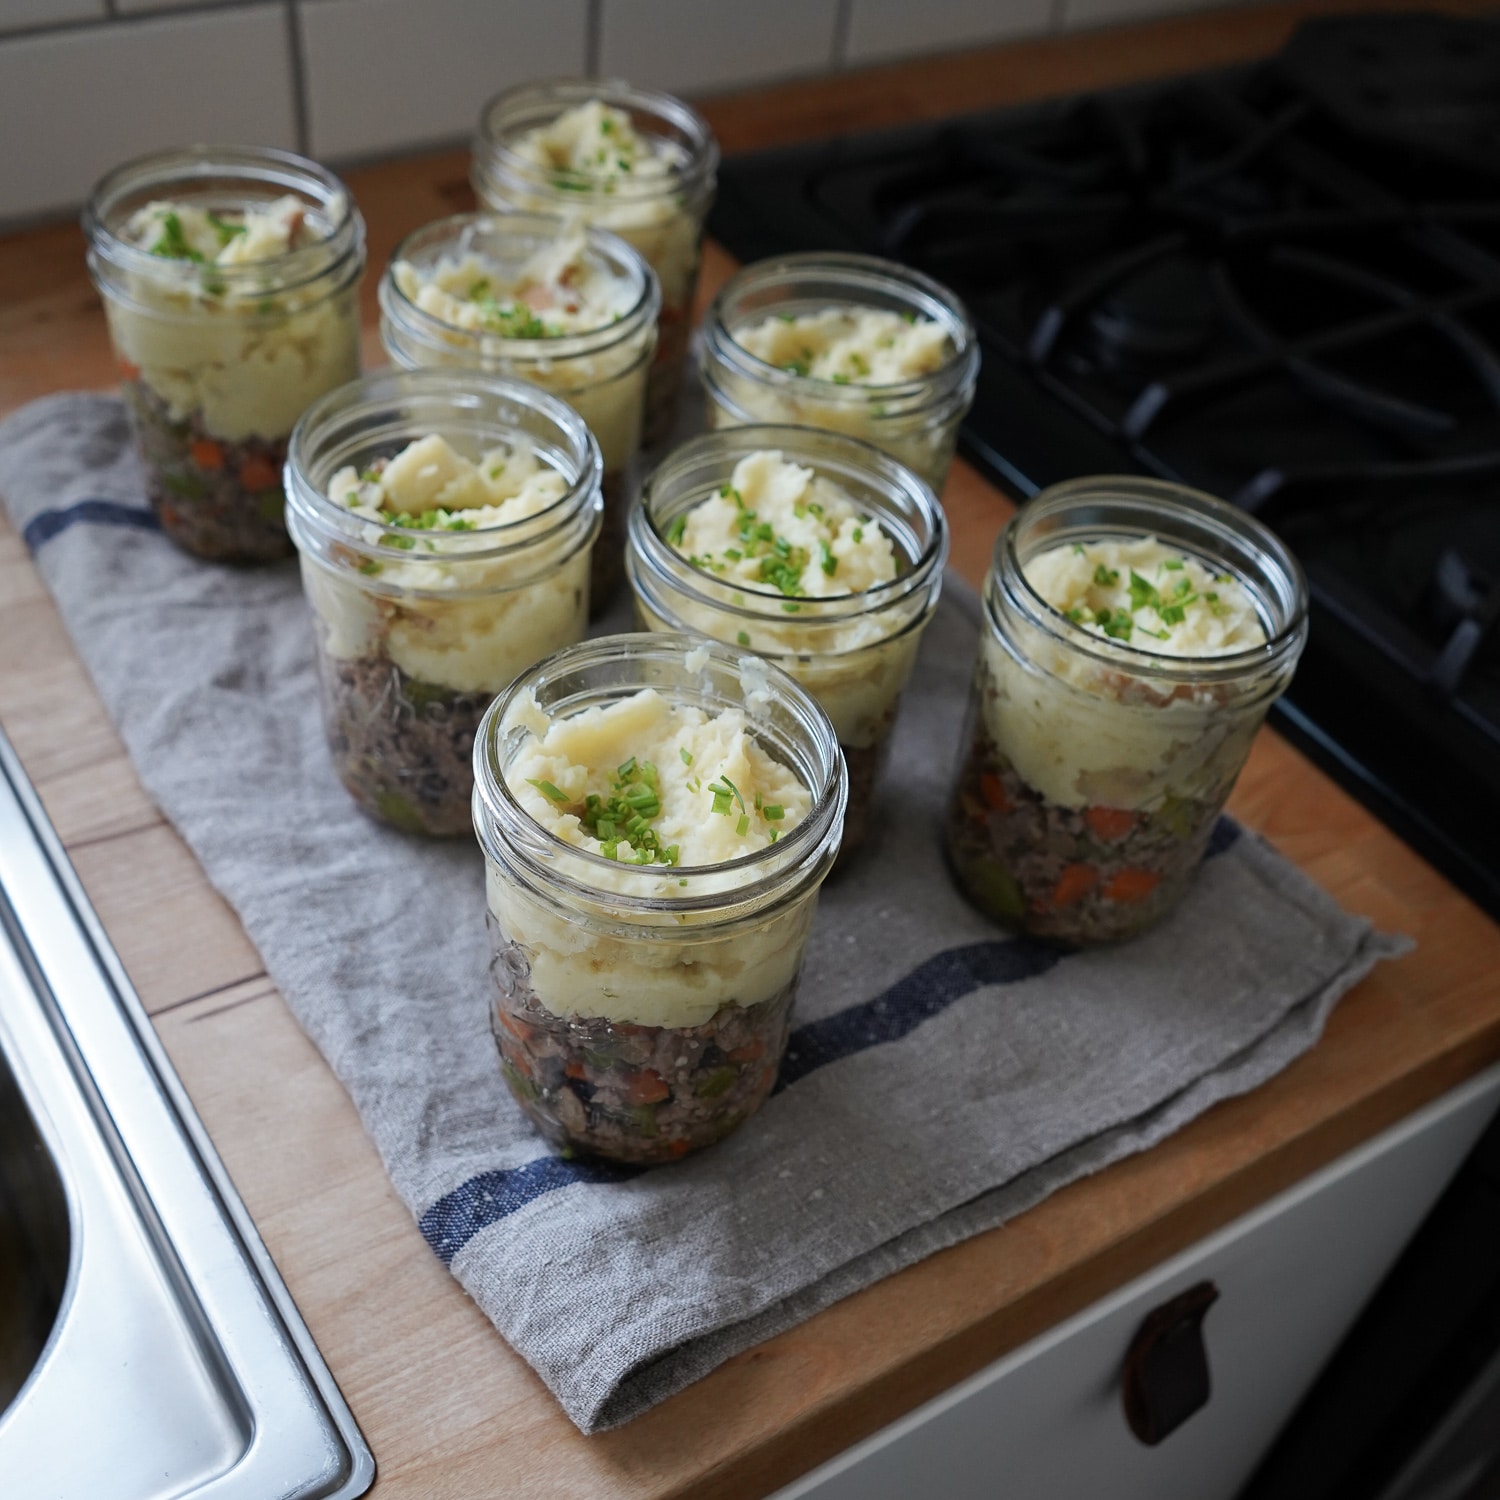
Shepherd’s pie is the perfect type of recipe to batch cook because it is a balanced meal (provides a good serving of meat, veggies, and healthy fats), you can easily make large quantities, it isn’t too time consuming, and the leftovers keep in both the refrigerator and freezer remarkably well. Add to that list ingredients that are both affordable and able to be found in grocery stores year-round, as well as how adaptable the recipe can be to substitutions, and we’ve got a clear winner on our hands!
I share a lot of my batch cooking behind-the-scenes over on my Instagram account, and the most-frequent question I get related to it is about freezing in glass jars. As long as you use wide-mouth Ball-type pint mason jars (like these!), without shoulders, only fill them to the freezer line, and cool your food in the refrigerator before freezing they should not break. I’ve been freezing food in these jars for the last 7 years using this method, and I have yet to have one break on me.
Be warned my Shepherd’s Pie recipe makes a lot… enough to last at least 10 servings in our house (we are pretty active and eat large portions). If you are feeding one person, or worried about making too much, this recipe works perfectly well halved!
- 4 large parsnips, chopped (about 5 cups)
- 2 medium white sweet potatoes, chopped (about 5 cups)
- 1 tablespoon solid cooking fat (coconut oil, lard, tallow, etc.)
- 1 yellow onion, diced
- 5 cloves garlic, minced
- 4 medium carrots, diced (about 2 cups)
- 5 ribs celery, diced (about 2 cups)
- 2 cups diced mushrooms
- 2 teaspoons sea salt, divided
- 1 14-ounce can coconut milk
- 2 pounds grass-fed ground beef
- 2 tablespoons minced fresh rosemary
- ½ teaspoon onion powder
- ½ teaspoon garlic powder
- ¼ cup bone broth or water
- ½ lemon, juiced
- Fresh chives, for garnish
- Start by cooking the mash. Place the parsnips and sweet potatoes in the bottom of a big pot and fill with water. Turn on high, and cook at a boil for 20 minutes, or until fork-tender.
- Meanwhile, start the filling. Add the cooking fat to the bottom of a skillet on medium heat. When the fat has melted and the pan is hot, add the onion and cook, stirring, for about 5 minutes or until translucent. Add the garlic and cook, stirring, until fragrant, about 30 seconds.
- Add the carrots and celery to the pan, along with more cooking fat if the mixture seems dry. Saute for 10 minutes, stirring occasionally, until just tender. Add the mushrooms and ½ teaspoon of the sea salt and cook for 2 more minutes. Turn off the heat and transfer to a large bowl; set aside and allow the pan to cool before making the beef.
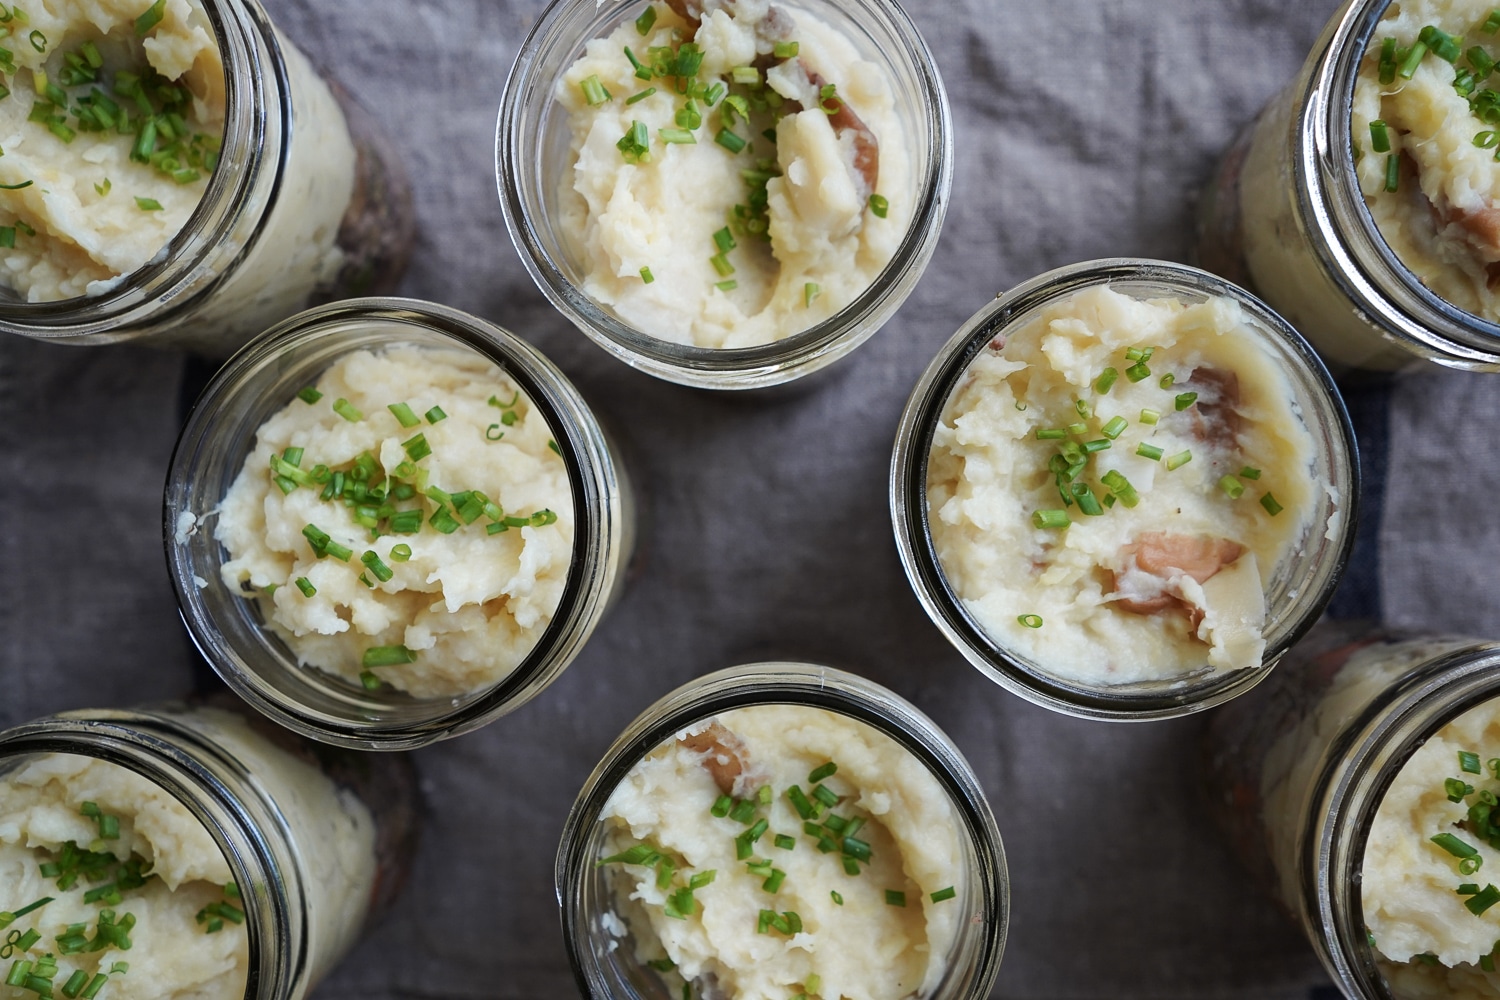
- When the mash vegetables are finished cooking, carefully strain them and place them back in their pot to cool for a minute or two. Add the coconut milk and 1 teaspoon of sea salt; mash until desired consistency is reached. Set aside while you finish the filling.
- Using the same pan you used to make the vegetables, add the beef to the cooled pan, breaking up into small chunks. Turn the heat on to medium, and cook, stirring and breaking up chunks, until just cooked and liquid is released (about 8 minutes). Add the rosemary, onion powder, garlic powder, ¾ teaspoon sea salt and broth or water and stir to combine. Continue to cook until liquid is mostly absorbed and spices are combined (about 4 minutes). Turn off the heat and set aside.
- Combine the beef mixture with the vegetables in a large mixing bowl. Sprinkle with lemon juice.
- Portion into 8-12 wide-mouth pint jars, or other storage containers, with a serving of meat mixture on the bottom and mash on the top. Garnish with chives.
Feel free to swap out the ground meat for other types, and the mash vegetables as well (for instance, cauliflower can be used to make a lower-carb version but cooking time will need to be adjusted). This recipe is very adaptable.


35 comments
Finally, a recipe I don’t have to double or triple! With three kids–one teenage girl and 2 preteen boys–I feel like I just have to cook for an army every day!
Woohoo! Hope you love it Stefani, it sounds like you have a house full of big eaters!
LOVE this idea! So cute in these individual servings!!
Curious if your freezer has the coils as shelves? I find placing glass jars on them directly can cause breakage even if the food is cooled before. I’ve started putting something underneath them to be safe but am curious about your freezer 🙂 Also, how do you re-heat the food? Directly in the glass jars? I don’t like to use a microwave so I’m interested to hear more about the re-heat.
Thanks Mickey!
Hi Gail! No, my freezer has plastic drawers. I reheat by placing from freezer to fridge for 24 hours, then scooping into a baking dish to heat in oven or skillet to heat slowly on stovetop. I am not against microwaves but I have a small kitchen and don’t own one.
Thank you Mickey!! I have nutrient dense kitchen and love it!!! I love you too and your gentle and kind way-you have given so much to AIP community!!! Bless you!!
So happy you love it Jeannie!
This was so good!!! I even ordered the jars you linked to on amazon, which definitely makes the cutest batch meal ever! Do you have any other recipe suggestions that work well in ball jars?
Hi Ashley! I am so happy you liked it. Honestly, any soup or stew is going to be fabulous in jars. Here are two that are always on my freeze list:
https://autoimmunewellness.com/magic-chili-dairy-nightshade-gluten-grain-free/
https://autoimmunewellness.com/butternut-breakfast-soup/
I don’t can so Bell jars scare me. I’ve tried to buy them at retail to get the screw top and every time I get the canning lids which I don’t want. I assume you freeze this with a screw top, right? How do I buy the jars with the right screw top lid? #It takes a village. Thanks!!
Hi Lisa! I don’t can either, but I find these jars to be very handy. I don’t use the lids that come with them, I purchase these ones on Amazon that are MUCH easier to use: https://www.amazon.com/Ball-Wide-Mouth-Plastic-Storage-8-Count/dp/B000SSN3L2/ref=as_li_ss_tl?ie=UTF8&qid=1474928587&sr=8-1&keywords=ball+wide+mouth+plastic+lids&linkCode=ll1&tag=autoipaleo-20&linkId=fd1fbe77e10e11c314fd942d25568773
I was at Target today and in the isle with canning jars there was metal one piece tops for $4.99 for
six.
I just made my second batch of this. I love love love it!! Thank you so much for bringing shepherd’s pie back into my life!
Glad you love it Joanne!
Will regular sweet potatoes work fine? If I can’t find white sweet potatoes where I live?
Hi Melissa! Yes, the orange varieties will work fine!
Hi Mickey! Thank you for sharing your knowledge so generously. My question is this; do you use metal lids for your glass containers or plastic? AND do you label the jars? If so, how? Thank you so much! Jessica
Hi Jessica! I use the BPA-free plastic lids from Ball. I do label them with freezer tape. Hope it helps!
Oh. My. Goodness. This was delish. My only complaint is that you said it serves 8-12…but in our house, it will be more like 6 bc hubby and I couldn’t stop sneaking bites of it! I didn’t put it in jars, just left it as “make-your-own” – take a scoop from the bowl of meat and veggies, too it with a scoop from the bowl of mash. I kept the leftovers separate also.
I always like reading other peoples’ recipe notes, so here are mine – I omitted garlic but increased the garlic and onion powder (I’m low FODMAP but I can tolerate the powders). I hate coconut, so although I used coconut oil, I subbed water for the coconut milk. (Next time I’d add less water; I had to simmer it after mashing since there was extra liquid. I guess coconut milk is a little thicker than water, so the outcome is not so runny.) I might wilt in some spinach next time for an extra dose of leafy greens.
Thank you for such a great recipe! I’m an AIP newbie, and this is helping me get off to a great start.
I’m so happy you loved it, and thanks for sharing your substitutions!
I made this recipe exactly as you outlined it and it was a hit! We loved it! Thank you so much for sharing this recipe. You are a real inspiration.
I’m so happy you loved it Susan!
This recipe was a big hit with my boys! I’m making a second batch for my son to take to college.
Susan, thanks for letting me know! Super smart to use a recipe like this during a time of transition.
This was exactly what I was looking for! I didn’t have everything on hand to make the recipe completely AIP friendly, so I subbed the sweet potatoes and parsnip with red potatoes (delicious with the coconut milk & little garlic powder, salt & parsley) & omitted the mushrooms (wish I had these on hand!). I cut the recipe in half and scooped the beef mix on the bottom of a square casserole dish & topped with the whipped mashed potatoes. My husband loved it! Me too! Thank you for this great concoction!
I’m happy you loved it Kim!
Love this dish, just new to all this type of food and wondered why you don’t put either tinned tomatoes or Passata in which I have always done in the past
Hi Ali! Tomatoes are from the nightshade family and avoided on the Autoimmune Protocol, which is why they are avoided in this recipe 😉
Thank you so much for all the recipes that you share! This is my favorite batch cooking recipe and The Nutrient Dense Kitchen is my favorite AIP cookbook. I hope you know how much easier you’ve made my life.
Hey Kira! Thanks for stopping by to share, I’m so happy you love it!
This looks wonderful! What would you recommend substituting for the parsnips and white sweet potatoes? Neither are available in my area. 😢
Hi Bev! You can try celeriac, turnips, or rutabaga!
This is the perfect recipe to prep for a two week road trip I’m about to embark on during my 90-day AIP elimination. Question: what’ the best way to thaw and reheat once frozen?
Pauline, great idea! I like to thaw in the fridge for 1-2 days and then transfer to a dish to heat in the oven or a skillet on the stovetop. You can also use a microwave.
This has become a favorite recipe! I’ve made it probably 5 times now and it’s my absolute favorite thing to pull out of my freezer on days I need something filling and quick to eat. I made it for my non-aip boyfriend, and he approved and said I could make it anytime. Thank you!
Sarah, glad it has become a favorite in your house as well!